Recently a group of students called
Austin Kleon's link to my attention. He has written "How to Steal Like an Artist" and he posted this image 'stolen' from Peter Jenny's "Figure Drawing" book.

While I agree with with both Messrs Kleon and Jenny, that drawing from photos is pretty handy assuming you can't get out in the world because you're very busy writing books and can't draw from life. But know that any drawing you do from a photo is going to just appear flat due to the source. But drawing the way regrettably shown above is, in a word, 'yawn'. At the risk of alienating the two writers above, maybe I should clarify with 'dull', 'dead', 'stiff', 'uninteresting', or just 'LAME'. At least for you animator types or folks who think drawings should be dynamic and alive. Drawing from an inside wire frame, especially as in the regrettable stolen photo above automatically stiffens up a drawing. I think perhaps Mr. Kleon and Mr. Jenny are really busy writing books and when you're busy writing books you tend to overlook important stuff (I mean, heck, just writing this post made me forget to feed my kids) but as an artist, you need to present images especially figures that are ALIVE.
Let's take a look at a photo and see where I'm going with this. Google Sports illustrated and then go to the images search and....uh...okay, don't do that because you won't find many sports photos because they have that Swimsuit issue thing which can get pretty distracting. So just go to
Sports Illustrated and look at their photos link. I found this
photo of Connie Mack giving the what's what to a rookie back in 1920. ( I love old sports photos)

And then we'll just drop in the implied shoulder to medial line to hip connections and link up the arms and legs and viola instant totally awesome drawing, right?

I know you're saying, "Golly, it's hard to see that much awesomeness with the actual photo behind it." so I removed the photo to really highlight the lines.

It looks like a 3D rig now, so it must be right, right? Well let's use that to get a drawing.

Above is a quick drawing with said 'interior lines' and added construction. Something has gone amiss with this. Perhaps it the overall stiffness of simplified lines on organic forms.

Using an 'interior line' setup such as this really only enables you to get an very simple idea of whatever action is taking place. There is little to no hint of weight or suggested action and therefore the drawing becomes nothing more than just a set of mannequins. Which will in turn, do not lend an essence of life to the drawing which will make the viewer linger. So unless you have a writing contract and you're in a hurry, how about taking a step back and looking at the photo again.
Ask yourself, "What am I seeing and why am I drawing it, what's the story?" In the photo below there are two men, one who had a strong career and retired describing some finer point of pitching to a relative newcomer (who is youthfully confident) to the game. Then breakdown the poses; the one on the left is describing and pretending to throw what looks like a knuckle-ball. He is in mid pass/throw favoring the start of action. His right leg is planted and energy is traveling upward through his pelvis and being transferred through his ribcage. That energy is called Thrust or Force and the ribcage must Torque to transfer the energy. Ultimately this prepares the right shoulder to move across the chest dragging the arm and thus catapulting the "ball" from the hand. The guy on the right is watching in a polite, yet arrogantly distracted slouch.

"Okay, so what? I have more books to write." says Mr. Kleon and Mr. Jenny. Well, fellas, if you really stole like an artist you would know that as an organic form, force and torque would cause the right side of the upper body to stretch, in turn making the left compress slightly. Conversely the transfer would cause the left side of the pelvis and lower trunk to stretch. A slouch on the other figure pushes out the back and forces forward the anterior portion (that's the front for you busy writer types) of the pelvis. Below is an example of what is really going on as far as the gesture in the photo.

Which in turn allows for a more active drawing of the figures below.

I know you're asking...

And I'm glad you asked. because if you draw loosely and really employ the action you 'stole' from life you can create gestures and animate characters such as the ones below. I used the same gestures from above to get these two fellows. More story, more life.

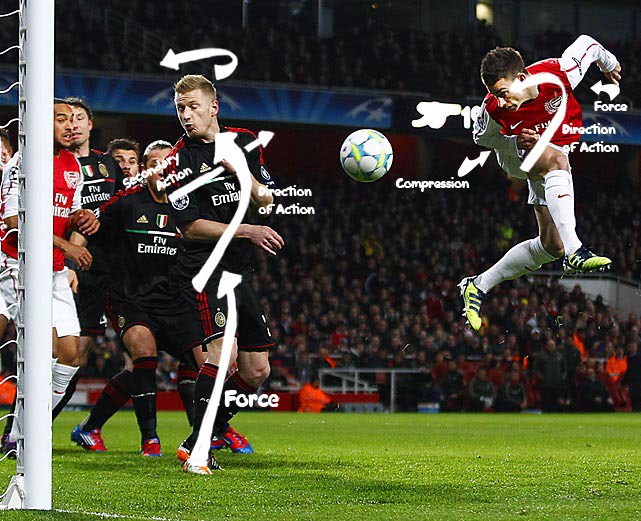
Here's is another example. And it's a doosey! Have a glance at this amazing photo
also from SI by Eddie Keogh. I am not a fan of soccer (which puts me in the less than 1% of the human population) but this photo makes me want to be one. Well sorta. Look at the drama happening here; the guy on the right has leaped way up high to head in a ball past the defending guy on the left who has turned, or at least in this split second photo, is turning into a protective block to spare his body the collision with the ball. Dang!

So let's go back to 'stealing' like Mr. Kleon or 'gesturing' like Mr. Jenny. Using this method we get this.

And because we want to see that awesomeness again, we have taken out that pesky distracting photo and we get the lovely below.

I know what you're going to say, but I haven't even put in the construction lines yet.

Okay there they are. Look at how...how...how positively 'UN-dynamic' those poses are. Bleah, I bet
Eddie Keogh is face-palming right now. How insulting a drawing like this would be to such a magnificent photograph?! In fact really the only way to save the drawing is to make it into two toy robots from the fifties fighting like below.

Ah, that is a tiny bit better. Insert your own laser sound effect here. Pew pew pew! Incidentally, if you want to see fantastic paintings of toy robots AND donuts check out my buddy
Eric Joyner's work and you will not draw toy robots because his are more awesome then the awesome you can only pretend to be at drawing robots (with donuts).
So, what's really happening here, Mr. Kleon and Mr. Jenny? Sorry to bug you while you're busy writing. Well, the guy on the right has just launched himself off the field with his left foot while twisting his body around to blast the ball with his forehead. His left arm is in mid-pitch which will then paddle outward to give the chest and neck full thrust in the opposite direction. his entire right side is painfully compressed and his right arm is tucked just to get out of the way. The guy on the left is in mid-flinch. His head has whipped around to the right away from the ball as the left shoulder raises in preparation of impact.

So really, the energy looks like this.

That means that the gesture really looks like the image below. Draw to the areas of most torque, not through the center. Another post is coming on this subject but you'll have to wait until I feed my kids.

Here are some quick notes I made while stealing from nature.

Which lead to this drawing below.

Mr. Jenny, you are probably asking,
Because (and again, I'm glad you asked) we are PUSHING what we've stolen. Pushing the force, the torque, the energy, the very essence to make a drawing live outside of realm of stillness and bad drawing-ness. Which allows for a drawing and then leading to animating drawings and poses that are alive and filled with energy. Speaking of stealing, I was drawing other poses for this post when my (unfed) daughter suggested I draw Princesses (because she loves them no matter how much food she has) so I drew these according to the gestures I already established. This was impacted by her saying every couple of seconds, "That doesn't look like her." or, "She wouldn't do that." or "Can we watch 'Tangled'?" But at least you get the idea.

Princesses locked in an epic battle of 'pretty'. Sound effects: Bliiiiing! Now go steal as Mr. Kleon suggests, but steal with the ability to push the poses and not draw stiff, dead, lame drawings. Steal to breathe life into your work, it will push push your characters, figures, and maybe even you book out of boring-ville to WONDERLAND! Thanks for stopping by.

 Fold the easy stuff first; pillow cases and top sheets (the ones that cover you) so you end up with nicely folded easiness and "Holy crap, what the heck do I do with this?!"
 Next, set the folded stuff aside for now and find a corner with elastic sewn in on the fitted sheet (shown below)
 Next, find the other corner down on the same side and tuck one corner neatly into the other...
 ... so the elastic and seamed corners match or are in the same position like below. You will need to use a hand to push the corners together. The other hand can be used to hold a camera phone (sorta) steady to take a picture that will be out of focus.
 Let's move on. Now you will see that you can almost lay the halved sheet flat. Almost but not quite. Throwers-of-the-fitted-sheet-on-floor-people, don't give up, this is not as hard as say figuring out your taxes or even walking and chewing gum at the same time so stay with me.
  Above you see the corners tucked together and below you see the other side all tucked neatly together.
 I don't mean to freak you out but here comes the most difficult part; taking the tucked corners shown above and tucking those together. It will be okay, let's all take a deep long breath here (I'll wait) and we'll continue. You can do this. if you can walk down a hallway more than a foot without crashing into a wall, this will be a piece of cake. Gather both pre-tucked corners and...
 ...begin to slide one corner in under the other as shown below...
 ...and pull them so they fit neatly into each other as shown below.
 Now you find that the tucked parts actually fold over completely effectively getting the weird elastic-y weird parts out of the way as seen below.
 See that wasn't so bad, now all you have to do is fold over the whole portion treating it like one piece of fabric...
 ...bringing corner to corner...
 and then smooth out with your hand while your other hand takes out of focus photo below.
 Which will give you a very nicely folded fitted sheet your mother would be proud to see you do.
 You can even fold it again (if the sheet is small enough to do so - shown here is a set of twin sheets).
 Now take all of the folded sheets and stake them neatly into a, um, stack...
 .and you're done. Wow, that was great! Go and pour yourself a nice glass of WAIT!!!!
 You need to put it away first. NOW you are finished, go get something cold to drink. You know you're a master of folding fitted sheets when you can do a set of queen sized sheets (they work the same way as twins, fulls, kings, and even Cal kings). Woot, high five! Now go fold other stuff, like those socks all over your floor. Next time, using the washing machine to actually wash those sheets of yours. Because after two months, it's like, dang. Right?