

Showing posts with label Skeleton. Show all posts
Showing posts with label Skeleton. Show all posts
Monday, November 16, 2015


Sunday, November 15, 2015

Friday, October 9, 2015
Animal Drawing: How To Find Your Animal's Proportions
So, you're drawing an animal and it keeps looking out of proportion, what should you do? As you know, the best way to draw a figure in proportion is to use its head as a unit of measurement. If you're a human, we use our head height from the top of the skull to the chin.
 Which gives us average measurements of top of head (T) to chin (Ch) to mid-rib cage or nipples (Ni) to navel (Na) to crotch (Cr) to mid thigh or above knee (Ak) to below knee -not bologna- (Bk) to above ankle (Aa) with about a half head to floor. Also described here.
Proportions of animals are a little harder to figure out because the landmarks on humans are different than on animals. I mean, we stand on two feet, they walk on all fours etc. but one thing that is consistent with animals in general is the skeleton. With that said, if you are studying any kind of animal - human or otherwise- you need to know what's going on underneath, in both bones and muscles. If you don't how to get started doing this or if you have used the internet to look up an animal (say a squirrel monkey) and can't find any on the animal's anatomy, use it's Latin name (Simia sciureus) and you will be more likely to find information more closely related to the animal's anatomy.
But, and this is important, CROSS REFERENCE your information! I have seen students bring in anatomy reference examples, drawn by other previous students, which are downright wrong. Photos are best but scientific illustrations are good as well if care was taken to scan or photograph them. If you can't find anything about your animal, look up which zoos have your animal in their collection and call or email them or their veterinarian and ask about reference material for the animal in question. Or talk to a zoo keeper, they are pretty cool and can help you in your endeavor. and they are happy to help if they can. There is always the tried and true method of GOING TO YOUR LOCAL LIBRARY to do some research (gasp). I know a lot of librarians-they are really cool and willing to help! And lots of libraries have free WiFi...and some even have coffee shops...what more do you need?
When you finally do acquire reference of the animal's anatomy, namely in profile, measure the skull from the front/tip muzzle to the back of the head where the spine meets it. Most quadrupeds have a spine that meets the skull at the back rather than below, unlike humans. Below is a photo of a polar bear, ursas maritimus, acquired from this site. Even this specimen, as beautifully as it's been articulated, isn't exactly correct as the fore paws are too far forward for it to stand naturally, but let's move on. I, like many others, LOVE polar bears; they are so large and furry and cool and furry and chunky and furry and furry. Did I mention furry? When you are just getting started drawing them, all that fur kinda gets in the way and you end up with weird bear shaped balloons because...furry. The skeleton has no fur so you can measure without distraction, woo! 'Had a student once who said, "I can't draw this cat because it's fluffy." Ahem, skeleton, duh.
 Using a compass, ruler or Photoshop you can measure the length of the skull and compare it to the animal's body. Humans are, on average, 7.5 heads tall. By the look of this bear, it is almost 5 heads long (4 3/4 including the skull where the skull should be) without fur so it's safe to say fur and all, it's 5 heads long with fur.
 Rib cage is two heads long, which means the construction shape you'll use to describe the ribs is a 2 heads long oval.
 Scapula is about half a head. Turn the head in the direction of the bone.
 Humerus is a head and change so about a head.
 Ulna is about a head's length, radius is typically just a bit shorter than the ulna on this, and many animals.
 Paw is just a tad more than half the head.
 Distance from rib cage to pelvis is about a 1/4 head. This is an important measurement, some animals such as tigers and lions have a full heads distance from the rib cage to the pelvis.
 Distance from rib cage to pelvis is about a head.
 Pelvis is about 1/2 to 2/3 head.
 Femur is a head.
 Fibula (yes, many of the bones of your animal are referred to the same names as your bones...sometimes)
 Hind foot (which looks close to a human foot) is 3/4 head.
 The width of the rib cage is about a head at its widest and the the distance to the floor from the rib cage is a head's length.
 Notice, must of these measurements I have described being "about" a certain length. Just like people, no two animals are exactly the same but overall the measurements will be close, that's one of the things that makes up that animal. make note of these measurements, and stay true to them as you continue your animal drawing explorations, they will eventually help to make your animal easier to draw and make it more believable to your audience.
Okay, okay...you're right. Not everything can be measured by the skeleton. You can also measure with a fully furred animal. Here's a photo from this site. Aw, a big furry polar bear, awwww!
 Use its head to check the thickness of the fore paw, about half a head on this fellow.
 The thickness of the midsection is about 1 1/2 heads.
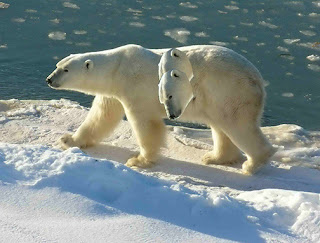 This polar bear's neck is about 3/4 a head in thickness.
 When you're talking about fur thickness and exterior information, you can use your own judgement on what you think looks best - that becomes the "art" part. But know what the proportions (at least the measurable stuff underneath) are first before jumping into the fluffiness. Draw from the inside, out. go and draw awesome animals. have fun drawing!
Thanks for stopping by.

Proportions of animals are a little harder to figure out because the landmarks on humans are different than on animals. I mean, we stand on two feet, they walk on all fours etc. but one thing that is consistent with animals in general is the skeleton. With that said, if you are studying any kind of animal - human or otherwise- you need to know what's going on underneath, in both bones and muscles. If you don't how to get started doing this or if you have used the internet to look up an animal (say a squirrel monkey) and can't find any on the animal's anatomy, use it's Latin name (Simia sciureus) and you will be more likely to find information more closely related to the animal's anatomy.
But, and this is important, CROSS REFERENCE your information! I have seen students bring in anatomy reference examples, drawn by other previous students, which are downright wrong. Photos are best but scientific illustrations are good as well if care was taken to scan or photograph them. If you can't find anything about your animal, look up which zoos have your animal in their collection and call or email them or their veterinarian and ask about reference material for the animal in question. Or talk to a zoo keeper, they are pretty cool and can help you in your endeavor. and they are happy to help if they can. There is always the tried and true method of GOING TO YOUR LOCAL LIBRARY to do some research (gasp). I know a lot of librarians-they are really cool and willing to help! And lots of libraries have free WiFi...and some even have coffee shops...what more do you need?
When you finally do acquire reference of the animal's anatomy, namely in profile, measure the skull from the front/tip muzzle to the back of the head where the spine meets it. Most quadrupeds have a spine that meets the skull at the back rather than below, unlike humans. Below is a photo of a polar bear, ursas maritimus, acquired from this site. Even this specimen, as beautifully as it's been articulated, isn't exactly correct as the fore paws are too far forward for it to stand naturally, but let's move on. I, like many others, LOVE polar bears; they are so large and furry and cool and furry and chunky and furry and furry. Did I mention furry? When you are just getting started drawing them, all that fur kinda gets in the way and you end up with weird bear shaped balloons because...furry. The skeleton has no fur so you can measure without distraction, woo! 'Had a student once who said, "I can't draw this cat because it's fluffy." Ahem, skeleton, duh.


Okay, okay...you're right. Not everything can be measured by the skeleton. You can also measure with a fully furred animal. Here's a photo from this site. Aw, a big furry polar bear, awwww!


Thanks for stopping by.
Sunday, March 3, 2013
Anatomy: Find the parts you know...

Recently, a student sent me this image of a common European mole skull (Talpa Europaea) asking how to find the eye socket on this little creature. At first glance, it is indeed difficult to find because the eye is not where you expect it to be. This mole, like most, spends nearly all of its time underground digging its way toward even smaller critters to eat. It's need for sight is almost unnecessary and the eyes have become nearly vestigial as the skull, over time, has evolved to enhance other, more necessary features; smell and strong, crushing jaws, not to mention, very large forepaws for digging (not shown).

Luckily, this animal is a mammal and with a little thought; you can locate landmarks in the bone structure that are comparable to anatomy we know well. I have pointed out recognizable bone masses below. The Zygomatic region (Zygomatic Process, Zygomatic Bone, and Zygomatic Arch all surround the Orbital (Eye) Socket and that tiny triangular shape is the home of the animal's eye.

Knowing this, we can now add the features. This mole has a relatively large nasal opening, making its nose a big shape as it angles up off the snout. Its large flat Mandible allows for a thick masseter (jaw muscle) and the sloping arch of the epicranius allows for a very strong temporalis. I have sketched in the head of this animal of the skull and below you can see the sketch more clearly.


Friday, October 7, 2011
Anatomy - Facial Expression
Greetings, was talking about facial expression today and remembered I started this e-handout but never finished it up to post. So without further ado, a quick guide to the muscle of expression.

Okay, it's a skull. Or not just a skull, a LABELED skull. Oh yeah! Neat huh? What's that? Where's the muscles? I know, this IS supposed to be a "Muscles of Expression" e-handout so...
Look, there they are, Technicolored for your convenience (actually they are all different colors, really, that's why Colorado is really pink because it's pink on the map. Anyway, I didn't draw many deep layer muscles because, well, they are deep layered muscles and not really vital to understanding facial expression as they act to "assist" the upper layer muscles. The buccinator (sounds like buck-sin-a-tor not like 'buccaneer') is about as deep layer as I got here. The levator palpebrae is under the orbicularis oculi and opens the eye, it's a deep layer muscle too. You'll notice that I included origin and insertion of these muscles (labeled as "O" and "I") because it's very important to know how the muscle works and therefore changes to the face so it can express. Origination of a muscle means where the muscle "pulls" to. Think of origination as the place where you dig in your heels at the start of a tug-o-war. Insertion means the part that is being pulled. If you were in a tug-o-war against a kitten, you would drag the kitten toward you....unless it was a REALLY big kitten, but that's another story.
 Let's go back to the skull, I have isolated the muscles and drawn what those specific muscles are doing. Refer to the labeled skull and labeled muscles images above to see where everything attaches etc. Here is an expressionless face that will be overlaid on the skull. In the images that follow, you will see this face (shown below) and on the left of the face, the muscle or muscle groups will be shown in action. Note, generally the muscles act as a group which also hides a specific muscle's action so the isolated versions may look out of context or even silly.
When applying expression, it's extremely important to learn the anchor points of the face, these keep the face in proportion even through many emotions may be expressed in a series. Because of the pliability of the face locate the parts that don't move so the rest doesn't get all "wonky".
The main anchor points (shown above) are the outermost points of the eyebrows, the corners of the eyes themselves, the connection of the septum and philtrum (the base of the nose) and back up. The upper teeth or maxilla The hair line usually stays in the same relative spot as do the cheek bones but that depends on the character. The points mentioned will always be the same in relationship to the entire face. If you pay attention to the triangle made from these anchor points, you get what many of my animator pals call the "Bermuda Triangle" of facial expression as shown below. Keep everything in this triangle in correct proportion and it will be much easier to keep the rest of the face in proportion.
To get started on the topic of muscular expression, I dropped in the frontal portion of the epicranius. This is the muscle that is associated with movement of the eyebrows. Expressions of fear and surprise use this muscle instinctively. If some outside stimulus is sudden or scarey, the epicranius immediately responds by pulling the eye brows upward out of the way so the eye can open wider and let in more information to better judge the situation. Raised eyebrows also express questioning, confusion, contentment and satisfaction among others.
Below the eye is wide open as the levator palpebrae (not shown) lifts the upper eyelid while the epicranius pulls the eyebrow upward.
The corrugator (below) which sits right in the 'notch' between the brow ridge and the nasal bone works to pull the eyebrow inward toward the nose, expressing anger, concentration, contempt etc. The epicranius and corrugator work together to pull the eyebrow up and inward to achieve a look of sadness or longing.


Which brings us to the procerus (in magenta) and nasalis (lavender). These are the 'nose wrinklers' which become especially prominent in expressing disgust. A yucky flavor, a nasty smell, a tall fat guy in a Hawaiian shrit - all of these make the nose want to wrinkle. These two muscles also work with the corrugator to aid in expressing anger as in the tightness of the center of the face.

The Orbicularis Oculii sits around the orbital rim of the eye socket it acts as an "activator" for other muscles such as those that make the face smile.
in addition, I drew an example of the eye closed. The closed eye is the relaxed levator p. as shown below. This is why you close your eyes when you sleep or why it's hard to keep your eyes open when you are tired, your levator p. is tired and can't keep the eye open.


Besides making the nostrils flair, the group of muscles known at Quadratus labii superioris work to activate the cheek and lips into the start of a smile or flesh under the eyes into a squint. these really help to pull the corners of the mouth outward to assist in smirks and also consonant formation also known as blend shapes or mouth shapes. There's another handout up here about just that. May post something newer and better...later.

Ah, below we have, the smile muscle (the zygomaticus, in orange) and the sneer muscle (the caninus, in red), two opposing forces doing constant battle. The smile verses the Idol, the "Billy Idol" that is. go back and read the origin and insertion and you'll get what I mean. The caninus also activates disgust and contempt.


Now the muscles that bring the face (and you) down. Or, at least show it. Below is the triangularis which works to draw the corners of the mouth down and assists in closing the top lip on the bottom lip.

And the quadratus labii inferioris (dark yellow) and mentalis (green) are the ones that really make you frown. The QLI pulls the lower lip down and forces it outward while the mentalis really pulls the lower down and rolls it outward away from the teeth and causes the wrinkes in the chin.

Below is one example how all the m,muscles of the face work together to get the face to express an emotion. Here is disgust. It could also read as bitter as in you just tasted unsweetened chocolate powder.
The muscles of the lips are also know as the orbicularis oris (in brown). This muscle closes the lips and is mostly responsible for mouth shapes. And for puckering up, how about a kiss? Mwwwah! The buccinator (dark green) draws out the corners of the mouth and pulls in the cheeks when you're standing front of the mirrow looking to see if you have lost any weight this week. This is also the muscle that causes the dimple just beyond the edge of the mouth. So those of you who have dimples, here is the muscle responsible.
Thought not directly responsible for expressing emotion, the temporalis (which is actually a chewing muscle) has been known to flex showing tension in the sides of the face to aid in showing stress or more often then not, a character will rub the temporalis to express quite contempt or exhaustion.
I would be remiss if I did not discuss the masseter (another chewing muscle but also the one that pulls the mandible back to the 'closed mouth' position. When relaxed as in sleep or after playing thirteen straight hours of WOW or Halo, this muscle is the one that lets the mouth dangle open so drool spill out copiously. When showing frustration or determination, the jaws will clench and flex-this is the muscle that employs that action.
The muscles of the face act as an orchestra that produce an entire concerto of emotions, some that last for fleeting moments and others that persist for a long time. Some expressions are strong, like anger or fear while others are subtle like pride or love. Take time to get to know and understand the actions of the face

Below are some examples of facial expression used in "Me and My Feelings; What Emotions Are and How we Can manage Them" now available. Can you name the expressions and even better, list all of the muscles used in each?


 Or...
Or...
 I hope this helps! If you are interested in reading further about emotions check out these books: Unmasking the Face and Emotions Revealed both by Paul Ekman. Now get out there and get some really expressive expressions! Thanks for stopping by.

Okay, it's a skull. Or not just a skull, a LABELED skull. Oh yeah! Neat huh? What's that? Where's the muscles? I know, this IS supposed to be a "Muscles of Expression" e-handout so...

Look, there they are, Technicolored for your convenience (actually they are all different colors, really, that's why Colorado is really pink because it's pink on the map. Anyway, I didn't draw many deep layer muscles because, well, they are deep layered muscles and not really vital to understanding facial expression as they act to "assist" the upper layer muscles. The buccinator (sounds like buck-sin-a-tor not like 'buccaneer') is about as deep layer as I got here. The levator palpebrae is under the orbicularis oculi and opens the eye, it's a deep layer muscle too. You'll notice that I included origin and insertion of these muscles (labeled as "O" and "I") because it's very important to know how the muscle works and therefore changes to the face so it can express. Origination of a muscle means where the muscle "pulls" to. Think of origination as the place where you dig in your heels at the start of a tug-o-war. Insertion means the part that is being pulled. If you were in a tug-o-war against a kitten, you would drag the kitten toward you....unless it was a REALLY big kitten, but that's another story.
 Let's go back to the skull, I have isolated the muscles and drawn what those specific muscles are doing. Refer to the labeled skull and labeled muscles images above to see where everything attaches etc. Here is an expressionless face that will be overlaid on the skull. In the images that follow, you will see this face (shown below) and on the left of the face, the muscle or muscle groups will be shown in action. Note, generally the muscles act as a group which also hides a specific muscle's action so the isolated versions may look out of context or even silly.
When applying expression, it's extremely important to learn the anchor points of the face, these keep the face in proportion even through many emotions may be expressed in a series. Because of the pliability of the face locate the parts that don't move so the rest doesn't get all "wonky".

The main anchor points (shown above) are the outermost points of the eyebrows, the corners of the eyes themselves, the connection of the septum and philtrum (the base of the nose) and back up. The upper teeth or maxilla The hair line usually stays in the same relative spot as do the cheek bones but that depends on the character. The points mentioned will always be the same in relationship to the entire face. If you pay attention to the triangle made from these anchor points, you get what many of my animator pals call the "Bermuda Triangle" of facial expression as shown below. Keep everything in this triangle in correct proportion and it will be much easier to keep the rest of the face in proportion.

To get started on the topic of muscular expression, I dropped in the frontal portion of the epicranius. This is the muscle that is associated with movement of the eyebrows. Expressions of fear and surprise use this muscle instinctively. If some outside stimulus is sudden or scarey, the epicranius immediately responds by pulling the eye brows upward out of the way so the eye can open wider and let in more information to better judge the situation. Raised eyebrows also express questioning, confusion, contentment and satisfaction among others.

Below the eye is wide open as the levator palpebrae (not shown) lifts the upper eyelid while the epicranius pulls the eyebrow upward.

The corrugator (below) which sits right in the 'notch' between the brow ridge and the nasal bone works to pull the eyebrow inward toward the nose, expressing anger, concentration, contempt etc. The epicranius and corrugator work together to pull the eyebrow up and inward to achieve a look of sadness or longing.


Which brings us to the procerus (in magenta) and nasalis (lavender). These are the 'nose wrinklers' which become especially prominent in expressing disgust. A yucky flavor, a nasty smell, a tall fat guy in a Hawaiian shrit - all of these make the nose want to wrinkle. These two muscles also work with the corrugator to aid in expressing anger as in the tightness of the center of the face.


The Orbicularis Oculii sits around the orbital rim of the eye socket it acts as an "activator" for other muscles such as those that make the face smile.
in addition, I drew an example of the eye closed. The closed eye is the relaxed levator p. as shown below. This is why you close your eyes when you sleep or why it's hard to keep your eyes open when you are tired, your levator p. is tired and can't keep the eye open.


Besides making the nostrils flair, the group of muscles known at Quadratus labii superioris work to activate the cheek and lips into the start of a smile or flesh under the eyes into a squint. these really help to pull the corners of the mouth outward to assist in smirks and also consonant formation also known as blend shapes or mouth shapes. There's another handout up here about just that. May post something newer and better...later.


Ah, below we have, the smile muscle (the zygomaticus, in orange) and the sneer muscle (the caninus, in red), two opposing forces doing constant battle. The smile verses the Idol, the "Billy Idol" that is. go back and read the origin and insertion and you'll get what I mean. The caninus also activates disgust and contempt.


Now the muscles that bring the face (and you) down. Or, at least show it. Below is the triangularis which works to draw the corners of the mouth down and assists in closing the top lip on the bottom lip.


And the quadratus labii inferioris (dark yellow) and mentalis (green) are the ones that really make you frown. The QLI pulls the lower lip down and forces it outward while the mentalis really pulls the lower down and rolls it outward away from the teeth and causes the wrinkes in the chin.


Below is one example how all the m,muscles of the face work together to get the face to express an emotion. Here is disgust. It could also read as bitter as in you just tasted unsweetened chocolate powder.

The muscles of the lips are also know as the orbicularis oris (in brown). This muscle closes the lips and is mostly responsible for mouth shapes. And for puckering up, how about a kiss? Mwwwah! The buccinator (dark green) draws out the corners of the mouth and pulls in the cheeks when you're standing front of the mirrow looking to see if you have lost any weight this week. This is also the muscle that causes the dimple just beyond the edge of the mouth. So those of you who have dimples, here is the muscle responsible.

Thought not directly responsible for expressing emotion, the temporalis (which is actually a chewing muscle) has been known to flex showing tension in the sides of the face to aid in showing stress or more often then not, a character will rub the temporalis to express quite contempt or exhaustion.

I would be remiss if I did not discuss the masseter (another chewing muscle but also the one that pulls the mandible back to the 'closed mouth' position. When relaxed as in sleep or after playing thirteen straight hours of WOW or Halo, this muscle is the one that lets the mouth dangle open so drool spill out copiously. When showing frustration or determination, the jaws will clench and flex-this is the muscle that employs that action.

The muscles of the face act as an orchestra that produce an entire concerto of emotions, some that last for fleeting moments and others that persist for a long time. Some expressions are strong, like anger or fear while others are subtle like pride or love. Take time to get to know and understand the actions of the face

Below are some examples of facial expression used in "Me and My Feelings; What Emotions Are and How we Can manage Them" now available. Can you name the expressions and even better, list all of the muscles used in each?


 Or...
Or...
Subscribe to:
Posts (Atom)