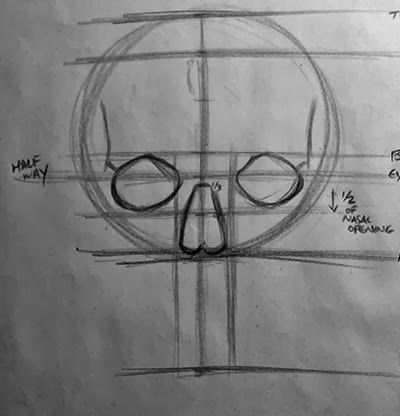
Halloween is coming up soon and if you haven't already put up decorations or can't afford any of that stuff, here's a quick skull drawing guide so you can make your own decorations and all of your friends will think you are snazzy because you don't stoop for that "buy Halloween decorations thing". I wouldn't know because I don't' have any friends and if I did, I doubt they would think I'm 'snazzy'. Ahem...where was I? Oh yes, drawing the anterior (that means frontal) skull.
I know everybody else has a video tutorial that is in 15 different languages with funny sound effects and music, but here you go, a step by step drawing shot entirely on my camera phone. WOOT!
First, start with a line.
Divide the line into thirds. If you don't know how to divide into thirds, click
here. If you wanna eyeball it, it's fine, whatever, no pressure on this post. Actually, you should be exact if you are doing medical illustration but hey, these are Halloween decorations, right?
Take a half of the top third and add to the topmost portion of the line as shown above. The head is three and a half units which I will discuss in a few steps.
Freehand a circle from the new top to the line separating the bottom unit from the one above it.
Take this whole measurement (3 1/2 units) and find the halfway point. This is the horizontal center of the head and will become the Eye line.
Mark off the measurements. Top of the line is top of head, the half step down is the hair line, one unit down in Brow, followed by the eye line just below the brow. Next line down is bottom of nose and the next unit line is the chin. Try this: Put your thumb to your chin and index finger to bottom of nose. Take that measurement and place thumb to bottom of nose and index finger to brow. Repeat thumb to Brow and index to hair line. Cool huh?
Now divide the unit from brow to bottom of nose into thirds as shown above.
The nasal orbital will be drawn here. At its widest, it is the same distance as it is tall and begins one third down from the brow, just beneath the eye line and goes all the way down to the bottom of nose line. It makes a sort of upside down heart shape, but a triangle works just as well.
Mark off the width of the nasal orbital. This will be the innermost point of the eye orbits. Try it, place your thumb and index finger on the sides of your nostrils (don't squeeze your nose) take that measurement and place it up to your eye. Your eye is the same width as your nose.
Draw a diamond shape or a tilted square from the brow line to half way of the nasal orbital.
Repeat for other eye. Note, eye line falls slightly above visual center of diamonds.
Round off the diamond allowing a slanted portion at the inner top portion of the eye orbit. I call this the "Angry Eye" part.
Draw a diagonal line from the rounded corners of the outer or lateral most portion of the orbit.
Follow this with slightly curved lines traveling upward about half way between the side of the circle and the side of the eye. This describes the temporal arch and is the side plane of the head.
Now, find the center of the eye orbit and draw a line down. The pupil will lie here later but this is also the widest point of the maxilla or the hard pallet of the mouth.
Divide the unit from bottom of nose to chin into thirds, the whole body is divisible by thirds this is called the
Golden Unit or Ratio.
The teeth line lies at the top third of this unit. Remember to draw in a arc as the frontal portion of the mouth is barrel shaped. I didn't draw the teeth at this time
Almost there, draw the side plane of the zygomatic bone as it travels downward from the zygomatic process (the diagonal line your drew by the top of the eye earlier. The zygomatic arcs laterally and changes direction or 'steps down' at the widest point of the eye orbit. Then steps down again at the lowest point of the ocular orbit.
Then it turns inward again to make a slight hook shape to connect to the line your drew the describes the teeth line. This completes the zygomatic bone frontal portion.
Repeat with the other side.
Find the lateral-most point of the zygomatic process and draw a line down. Also draw a line down from the outside edge of the eye orbit.
The zygomatic process line describes the outside edge of the mandible as it curve slightly into the angle of the mandible or that "hooky/pointy" part of your jaw.
As long as your at it, take the width of the nasal orbital and bring it down to the chin line. This is the width of the chin.
From the angle of the mandibula (mandible) there are two steps down that connect to the chin line.
The interior edge of the manible comes from the line brought down from widest part of eye orbit. It curves inward and describes the bottom teeth.
Repeat for the other side...
And you've got your skull. Whappo! I would expect at least 30 of these to be up around your house for Halloween...better get going.
Lost? Doesn't look right? Leave questions in comments below.
As long as we are discussing construction, we should cover the skull in turn around. Doing a turn around of any object or subject is easier if you know the construction or simple shapes of that make up what you are turning around (or turning in space visually). Below are notes from today's lecture with regards to turning teh skull. First step was review of the anterior skull.
Though I encourage students not to use rulers or straight edges, a turn around is one of those assignments that need one. I have extended the lines that make up landmarks (top of head, hair line, brow, eye line, bottom of eye orbit, bottom of nose, teeth, angle of the mandible, and chin among others) outward so as to use them in the turn. All of these landmarks will fall on the same lines in a horizontal turn. I have also labeled the drawing as a Key Pose (circled #1). In animation , a key would signify the start of action, in case the turn of the skull from frontal to right profile.

Here is a 90 degree pose the skull, the end of the action and so the 'out' key. The circled "5" is so named because traditional animation is shot on "twos" or each drawing is held for two frames of film. Assume the first key would last for two frames, frame 1 and 2 and this last key would be the fifth and sixth frame. I have simply placed the landmarks on the lines extended from the frontal skull. But what about the middle drawing or frames 3 and 4?
Here, the middle drawing, or breakdown, sits inbetween the two keys. It describes the arc or action the animation must follow from key to key. This drawing would be numbered 3 with an underline to designate the breakdown. Any other inbetweens would be added at this point to slow or even out the motion of the turn. The drawing is called a 3/4 and again, the landmarks sit on the designated lines. More about turnarounds, click
here. Now you have examples of a frontal, 3/4 and profile skull all based on simple shape construction. Go make Halloween turnarounds! Thanks for stopping by.