Thursday, March 20, 2008

Birthday Thanks


Hi, and I'm glad you're back again.
Today is my birthday and as I usually do today, I'd like to send out a thank you to everyone who has touched my life somehow. I don't know what I would do without any of you and I'm glad to know each and every one of you. I know we, in this busy world, often forget to reach out and thank those we know who have made our lives better and I- for sure- am pretty terrible at keeping in touch and saying how much I appreciate all the things big or little that everyone has made time to do for me.
So, I reserve my birthday, March 20th, not to have people wish me 'happy birthday' but to make time to thank all of you.
So, as the Mad Hatter says, "A very merry un-birthday to you" and thank you all so very much. Have a happy first day of spring and have fun drawing.
-Jeff Jackson

Friday, March 14, 2008

How to Draw A Turn-around

Just as the Cube Rotation Assignment was designed to get you to see volumes turn in space, a TurnAround is designed to show proportions of a character or object as they rotate in space. This helps you to draw the character consistently and proportionally "on model" in many views. Below are some lecture notes in the hopes that this process will be easier and make the creating a turnaround more fun. As always, begin you character with a gesture. I started with the world's most basic pose in an effort to simplify the information. When turning a character of your own, you really should pose the character in such a way that best describes the personality. I'll post some examples of good turns at the bottom of this...I'll probably get in trouble for doing so, but this is a "lonely" blog right?
Again, start with your "G".
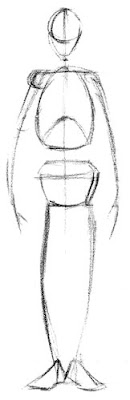
Then move on and flesh out the figure using "C" and "A". I left off the "T" to keep this quick. Your character should be turned in both a construction phase to show how you draw the character using construction and in a finished phase to show what the character's costume and other details look like.
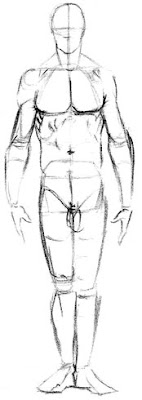
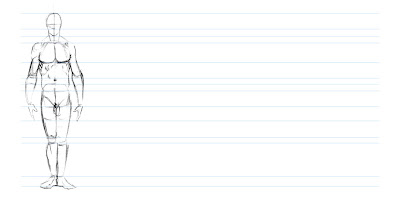
Once you have laid in a complete GCAT drawing in one view, draw out lines the touch key points such as construction shapes, details such as eyes, navels, and other stuff. You will draw to these lines and not past them. Remember these are your character's proportions, drawing shapes etc past these lines will throw off the proportions of the character.
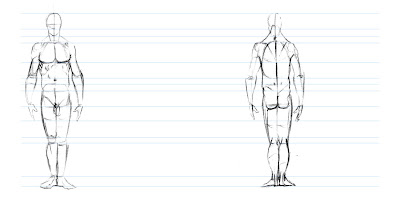
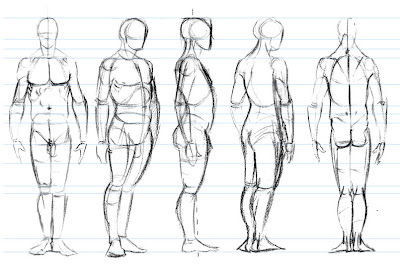
The next step would be to draw in the last pose of the turnaround. This pose is actually a key pose. Key poses describe the start and end of action in animation and as this is a five-point turn; the last drawing will be a view from the rear or a view 180 degrees from the front view. Notice how the components of this drawing line up to the lines created from the front view. Yes I did start this with a gesture but because it's such a straight pose, I left out that step.
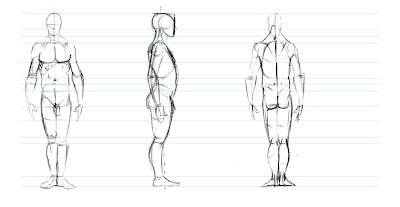
Go on the the next drawing, this pose in the turn should be the breakdown. This pose is drawn after the keys are complete and describe the action between pose to pose. In this case, this particular pose breaks down a 180 degree turn and thus, shows a 90 turn or the side view of the character as it turns from left to right.
Because drawing a turnaround between stringent lines will make your stiffen up, be sure you remember the implied gesture of a pose. Do not let yourself leave out the gesture of any step in the process, or else you get this visual vulgarity. I joke about this but I see it all of the time.
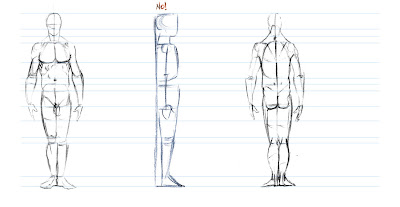
To prevent the above yuck, remember the implied gesture of your character. The spine of a figure is a natural "S" curve, very easy to see from the side. The neck gently curves back while the thoracic vertebrae sweep carry the ribcage forward. The lumbaric vertebrae change direction and the sweep of the spine ends through the sacrum. The legs have their own natural arcs to counter the curvature of the spine. Keep this in mind to keep your drawings alive.
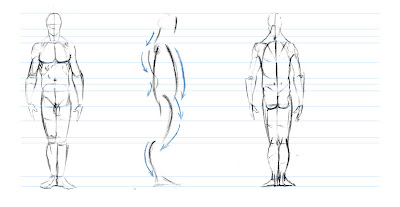
Flesh out this gesture to get a good profile view as shown below. notice also how the arm gently curves back to offset the weight of the trunk.
Now it's time to focus on the inbetweens. These are poses between the key and breakdown. In this case it's a 3/4 view of the front. Again get a good gesture first...
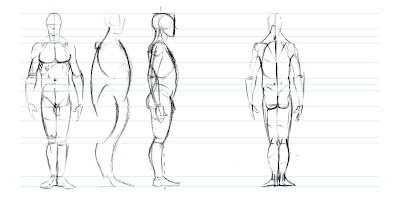
...And then flesh it out.
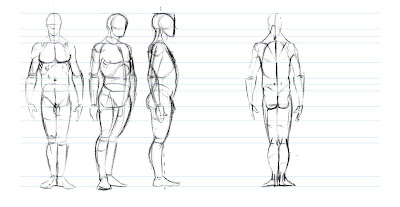
Almost done now-you can see where we are heading by now. By applying the steps mentioned you can draw in your 3/4 rear to complete this turn. Note that the amount of perspective incorporated into this is minimal. Assume you are looking through a 75mm to 100mm lens and the horizon line to which everything recedes passes through the center of the figure at about pelvis height. Don't overdo the perspective of you figure our it may blow out the proportions. What about a character, rather than a relatively stiff figure drawing group like the above (this too needs some updating), how do you draw up a turnaround of a non-realistic character?  The same method applies to anything that you plan to turnaround.  Take this character for example, Shim, a little fellow I drew up for in class assignments
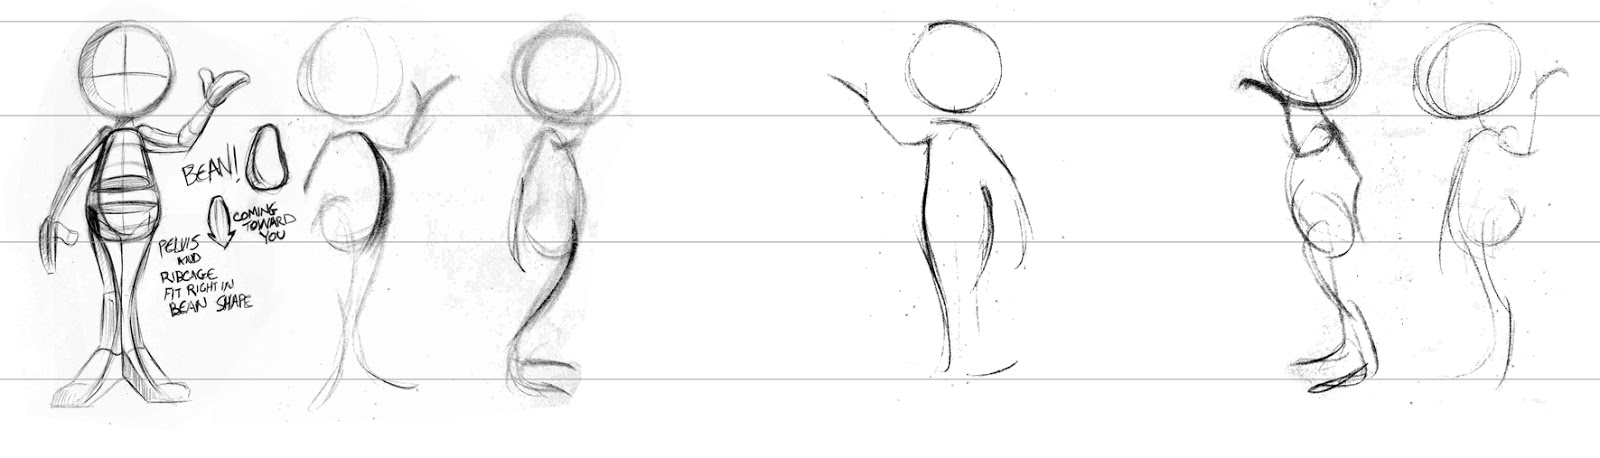
This character is a simple bean with gesture at it core.
And constructed with simple shapes including mitten hands and wedge feet.

Now that we have some hard masses we can plot out the rest of the body positions for the turn.  This will be an 8 point turn or one that rotates the character in 360 degrees, some times all that is needed in a turnaround is five poses; Front, 3/4 front, side or profile, 3/4 rear, and rear referred to as a five point turn.  The eight point turn is just a little more thorough from a motion stand point.  The back gesture is shown next because it would be a key if animated. I would suggest NOT inbetweening your way through a turnaround, stuff can get out of proportion if you do so.  

Here is an in progress of roughing out the gestures of most of the poses in the turn, this helps to see how the figure will appear to turn and to see where the poses will end up on the page or screen, and also acts to keep the drawings loose and hopefully prevents them from stiffening up.
Lay in your construction over the gestures, be sure to line up the corners of the hard masses with the ruled lines as shown above, doing so will make things easy and keep the proportions correct.

 After a little time you will get a roughed in version of your character.  At this stage the character will be cleaned up but I left it ruff as is to better get across the rotation of the construction shapes and how they conform to the gesture(s) of the poses. More to come from here, stay tuned and have fun drawing!

Here are some notes from a previous turnaround lecture...

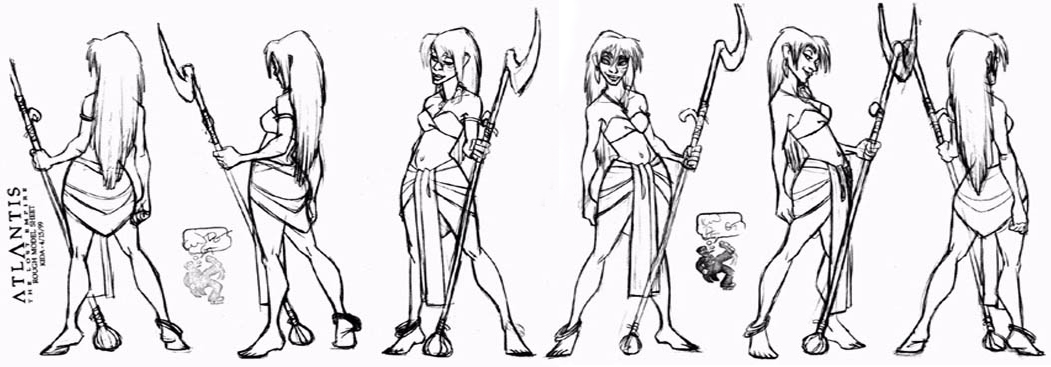
Below are some good examples for your perusal. Enjoy! I hope this helps with your turnarounds.
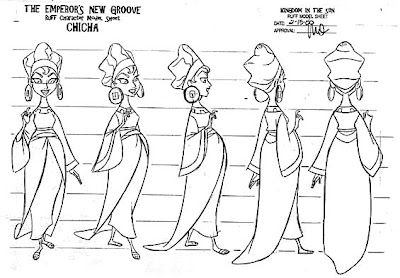


Tuesday, February 26, 2008

Still Working on Memory Bots

Hello and welcome back. I previous posts I showed sketches for a book on memory I am designing and (if they ever actually make a decision on something) illustrating. Well, here's a recent round of drawings I did for them. Not much new lately because they are slow to get back to me and slower to actually say what they are looking for. I don't know if you have ever gone through this but they can't make a decision because as they say, "Jeff your stuff is so good that it is hard to make a decision, each new drawing is great..." Alright I like compliments as much as the next guy but come on...just tell me what you're looking for, so of these are just terrible. Maybe they feel like because I'm the 'talent' that I'm fragile or something. We are all adults here, just pick something so we can move on.
Another bit of annoyance is the crunching out of new ideas only to find they liked the early stuff. Whoo boy, welp, work is work I suppose, and at least they LIKE my stuff. Too bad, I'm starting not too, yikes some of these drawings- I would have fired me. There was a pizza delivery job in the paper...
Er....Amara wants to play Elmo's Potty Time.
I'll post something more complete in a while, sorry.

Monday, February 18, 2008

Cookie Monster Interview

Howdy.

I love Cookie Monster, I always have, he's my favorite Sesame Street Icon. So because I have no cool images just yet, I thought I'd post this link to a video of NPR's interview with Cookie. Sorry no video file I can find but the link is great. If you're really paying attention; look at the broad actions and posing that make Cookie believable especially when he looks over his shoulders and pinches his nose. Wow, it's like a good animated character but in (pseudo) reality. There is a lesson to learned from just this four minute clip.

http://www.npr.org/blogs/incharacter/2008/02/cookie_monster_comes_to_npr.html

Thursday, February 14, 2008

Chest and Shoulders

Hello and welcome back. We have reached the point in the semester where we move from construction to anatomy and I have included some quick notes for constructing the chest and adding shoulders. In the first example below, I suggest either using an egg shape or a box to build the torso. Note, that both have the shoulders come off away from the central form. Egg shape users should treat the ribcage as a place where the clavicals, scapula, pectorals, deltoids, and trapezius are lowered onto the egg like should pads on a football player. This will "push" the shoulders out so the arms don't look like they a just sprouting from the ribs. Those who opt for the box, should draw out the six sided shape and then add a slight rise to the top as shown in 'A' and 'B'. This will get the the clavicals lower than C7 (the insertion point of the neck to trunk) The shoulders should then be drawn slightly inserted to the corners of the top of the box as shown.

In either case, one should always consider being able to "see up" from the front of the ribcage as it is turned slightly upward due to the curvature of the spine.

The next set of drawings are examples of both types of construction in use. Note the flatness of the top of the shoulder when at the side and the roundness when raised. I hope this helps,
Thanks for stopping by.

Thursday, January 31, 2008

Gesture 2 Character Examples

Hello out there,
I haven't posted in so long I forgot what I was last focused on...Oh yeah, the Santa challenge.
Seeing as it's January 31 already, looks like I sort of missed the seasonal nature of that. I'll post something a little later with that in mind. For that post I have to say is: "Saul Ruiz"- stay turned for more, friends.
In the mean time, my students are off working on gestures for the character class. So in lieu of the lecture on Wednesday the 30th, I am posting some examples that take a gesture and modify it to character. Students, I hope this aids in your WOZ characters for Monday's review.
First a more masculine gesture for the workbook. By adding a bit more sweep and delicacy to the lines, you can a much more feminine look while still keeping the action of the original gesture.
Same is true for the reverse, by thinking about the size of your simple construction shapes, you can take a softer more feminine gesture and use it to build another type of character; in this case, a short, heavy guy. In this case I opted to make the gesture just a bit more stiff by straightening the force lines a bit. These are very quick examples, if you need further details or more examples let me know by leaving a comment here. Have fun drawing!

Sunday, January 6, 2008

Meeting Sandborn's Challenge

So Mike Sandborn set up a challenge and I’ll never meet the deadline so I thought I’d cheat and post something I did for the SCBWI newsletter in May 07. It was a spot on graphic novels and here is the result. I know, I know…I’m no Pierre Allary but at least I’m trying to stay on the train as it were. Santa results are coming just hang on for the next posts. Thanks to Mike for including me on his challenge. 'Hope everybody had a great holiday break.